


First things first, welcome to my first article on Hashnode.
So in this article we will see:
- Introduction to Service Worker.
- Benefits of Service Worker.
- How To Build One.
- Creating a PWA.
So, How I got this Idea?
One day I searching for nice pair of headphones on Amazon but the experience the mobile web was really pathetic, I cursed myself for not having the app and I moved to Flipkart and surprisingly it gave me a great experience. The website felt more like an app and was performing pretty fast.
The developer mind then did some search around and found a surprising post about Flipkart on Google Developers website. That's when I got to know about service workers and PWA.
Introduction to Service Worker
Now, what exactly is a service worker? For beginners service worker is a script which runs in the background of a browser and acts like a proxy server. A service worker can handle cache, notification and background sync.
Benefits of Service Worker
- Faster Load Time.
- Less Round Trips.
- Better User Experience.
- Website can Work Offline.
- Enabling Push Notification.
This list might be small but these can actually make a difference to your website.
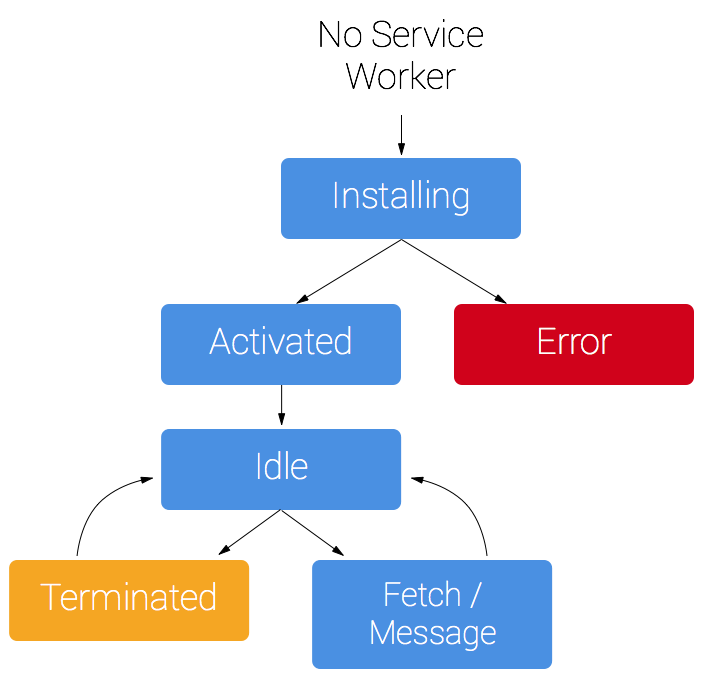
Below is a image showing lifecycle of service worker.
Before you implement service worker you need to go through a checklist.
PWA Implementation Checklist:
- Make sure your page is served via HTTPS.
- Must be mobile friendly.
- Site has cross browser support.
- Must load fast on 3G. ( Make website faster using these methods )
Steps to Create Your Own Service Worker
Installing Service Worker
//Add this below content to your HTML page, or add the js file to your page at the very top to register service worker
if (navigator.serviceWorker.controller) {
  console.log('active service worker found, no need to register')
} else {
  //Register the ServiceWorker
  navigator.serviceWorker.register('/service-worker.js', {
    scope: './'
  }).then(function(reg) {
    console.log('Service worker has been registered for scope:'+ reg.scope);
  });
}
Add this code to your main.js file or as a <script> to your html page. Also make sure to create a file named as service-worker.js and add to the root of your website.
Caching Using Service Worker
//Add this code to service-worker.js file.
self.addEventListener('install', function(event){
  event.waitUntil(
    caches.open('Cache-v1').then(function(cache){
       return cache.addAll([
        'https://yoursite.com/assets/css/main.css',
        'https://yoursite.com/main.js',
        'https://cdnjs.cloudflare.com/ajax/libs/font-awesome/4.7.0/css/font-awesome.min.css',
        'https://fonts.googleapis.com/css?family=Source+Sans+Pro:300,400',
        'https://fonts.googleapis.com/css?family=Open+Sans:400,700'
       ]);
    })
  );
});
This code will instruct the service worker to install and store these files into cache and serve them when they are requested again. by the user.
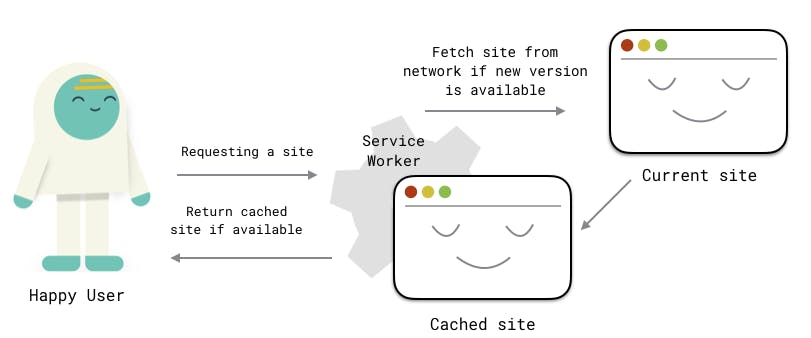 Service Worker Diagram by Netlify
Enabling Offline Page
Now sometimes to you might wanna show your visitor and page which say he or see is offline instead of the jumping dinosaur page.
//This is the "Offline page" service worker
// add an offline.html page to root or your website
//Install stage sets up the offline page in the cache and opens a new cache
self.addEventListener('install', function(event) {
  var offlinePage = new Request('offline.html');
  event.waitUntil(
    fetch(offlinePage).then(function(response) {
      return caches.open('offline-v4').then(function(cache) {
        console.log(' Cached offline page during Install'+ response.url);
        return cache.put(offlinePage, response);
      });
  }));
});

//If any fetch fails, it will show the offline page.
//Maybe this should be limited to HTML documents?
self.addEventListener('fetch', function(event) {
  event.respondWith(
    fetch(event.request).catch(function(error) {
      console.error( 'Network request Failed. Serving offline page ' + error );
      return caches.open('offline-v4').then(function(cache) {
        return cache.match('offline.html');
      });
    }
  ));
});

//This is a event that can be fired from your page to tell the SW to update the offline page
self.addEventListener('refreshOffline', function(response) {
  return caches.open('offline-v4').then(function(cache) {
    console.log('Offline page updated from refreshOffline event: '+ response.url);
    return cache.put(offlinePage, response);
  });
});
This code will simple cache your offline page and show it to your user whenever network request fails.
Enabling Offline Analytics
Sometimes due to Google Analytics the offline page feature might not work. Simple add the below code to your service worker.
importScripts('https://storage.googleapis.com/workbox-cdn/releases/3.6.1/workbox-sw.js');

workbox.googleAnalytics.initialize();
Creating a PWA
Now that you have successfully implemented an service worker, you are half way down. Simple edit and add the below manifest at the root of website.
{
  "name"              : "yoursite",
  "short_name"        : "yoursite",
  "description"       : "yoursite desc",
  "start_url"         : "/index.html?=PWA",
  "display"           : "standalone",
  "orientation"       : "natural",
  "background_color"  : "#2897ed",
  "theme_color"       : "#2897ed",
  "icons": [
    {
      "src"           : "https://cdn.yoursite.com/images/64.png",
      "sizes"         : "64x64",
      "type"          : "image/png"
    },
    {
      "src"           : "https://cdn.yoursite.com/images/128.png",
      "sizes"         : "128x128",
      "type"          : "image/png"
    },
    {
      "src"           : "https://cdn.yoursite.com/images/192.png",
      "sizes"         : "192x192",
      "type"          : "image/png"
    },
    {
      "src"           : "https://cdn.yoursite.com/images/256.png",
      "sizes"         : "256x256",
      "type"          : "image/png"
    },
    {
      "src"           : "https://cdn.yoursite.com/images/512.png",
      "sizes"         : "512x512",
      "type"          : "image/png"
    }
  ]
}
And add the below code to your html page in <head></head> tag.
    <!-- PWA Manifest-->
    <link rel="manifest" href="/manifest.json" />
That's it your PWA is ready.
Doubts or suggestion? Comment down below or catchup with me on twitter .